
Koa源码学习
作为一个有追求的前端工程师,对于 NodeJS 的学习,自然是不可少的。而学习 NodeJS Web 开发,必然也会接触到 Koa。最近业务上使用了 Koa 作为后台,写得多了自然就对其原理产生了兴趣,因为就赶紧来研究了一波。
什么是 Koa
Koa 是一个新的 web 框架,由 Express 幕后的原班人马打造, 致力于成为 web 应用和 API 开发领域中的一个更小、更富有表现力、更健壮的基石。 通过利用 async 函数,Koa 帮你丢弃回调函数,并有力地增强错误处理。 Koa 并没有捆绑任何中间件, 而是提供了一套优雅的方法,帮助您快速而愉快地编写服务端应用程序。
使用 Koa
既然要学习一个框架的源码,自然要了解它的用法是怎么样的,下面简单介绍下 Koa 的几个用法。
必修的 hello world 应用:
const Koa = require("koa");
const app = new Koa();

app.use(async ctx => {
  ctx.body = "Hello World";
});

app.listen(3000);
使用以上代码,就可以开启一个简单的 HTTP 服务了,可以看得出来非常简洁优雅。
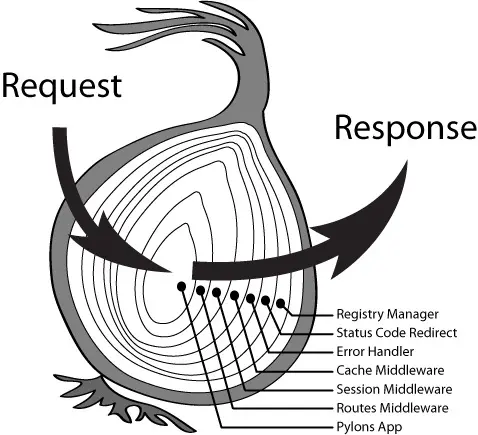
除此之外,Koa 最令人著名的是 洋葱模型。下面用一张图片和一个例子来介绍什么是洋葱模型。
const Koa = require("koa");

const app = new Koa();
const PORT = 3000;

// #1
app.use(async (ctx, next) => {
  console.log(1);
  await next();
  console.log(5);
});
// #2
app.use(async (ctx, next) => {
  console.log(2);
  await next();
  console.log(4);
});

app.use(async (ctx, next) => {
  console.log(3);
});

app.listen(PORT);
console.log(`http://localhost:${PORT}`);
use 方法是 Koa 的核心方法。 每一个use` 的使用,都是向 Koa app 中添加一个中间件 (middleware)
访问 http://localhost:3000,控制台打印:
1;
2;
3;
4;
5;
当程序运行到 await next() 的时候就会暂停当前程序,进入下一个中间件,处理完之后才会仔回过头来继续处理。所以执行完 console.log(3) 后,又会回到前一个中间件,执行 console.log(4),接着再回到前一个中间件,执行 console.log(5),所以程序才会有这样的输出。
Koa源码探索
了解完 Koa 的基本用法之后,就可以尝试学习一下 Koa的源码了。
https://github.com/koajs/koa/tree/master/lib
可以看到 Koa的源码只有四个 js 文件
-application.js - context.js - request.js - response.js;入口文件为 application.js。
先看看几个关键的方法
listen(...args) {
    debug('listen');
    const server = http.createServer(this.callback());
    return server.listen(...args);
}
listen 方法主要是调用了原生 http 模块的 createServer 方法,将 Koa 的处理方法 callback() 传入,然后起一个 HTTP 服务,比较简单。
callback() {
    // 这里是对中间件的处理,后面再细讲
    const fn = compose(this.middleware);

    if (!this.listenerCount('error')) this.on('error', this.onerror);

    const handleRequest = (req, res) => {
      const ctx = this.createContext(req, res);
      return this.handleRequest(ctx, fn);
    };

    return handleRequest;
}
使用过 Koa 的同学都会知道 ctx 这个东西的存在,这其实是一个上下文,Koa 将请求过程中的基本信息都放到里面去了,包括原生 Node 的 Request 和 Response 对象,可以进入到 createContext 方法看一看。
const response = require('./response');
const context = require('./context');
const request = require('./request');

// 实际上是类构造函数 这里简单放在这里了
constructor(options) {
    super();
    //...
    this.middleware = [];
    this.context = Object.create(context);
    this.request = Object.create(request);
    this.response = Object.create(response);
		// ...
 }

// req res 为 原生 Node 的 Request 和 Response
createContext(req, res) {
  	// context request response 这三个对象都是 Koa 自身提供的属性
    const context = Object.create(this.context);
    const request = context.request = Object.create(this.request);
    const response = context.response = Object.create(this.response);
    // 这里胡乱操作了一波,简单讲就是把对象之间互相挂载 方便访问
    context.app = request.app = response.app = this;
    context.req = request.req = response.req = req;
    context.res = request.res = response.res = res;
    request.ctx = response.ctx = context;
    request.response = response;
    response.request = request;
    context.originalUrl = request.originalUrl = req.url;
  	// state对象可以用来挂载业务自定义的一些属性 比如用户鉴权成功后 挂载 ctx.state.user = user;
    context.state = {};
    return context;
}
看到这里很多同学可能会好奇,request response 到底是做了什么呢。
其实也非常简单,进入到 request.js 文件中看一下。
module.exports = {
  get header() {
    return this.req.headers;
  },
  set header(val) {
    this.req.headers = val;
  },
  get headers() {
    return this.req.headers;
  },
  set headers(val) {
    this.req.headers = val;
  },
  get url() {
    return this.req.url;
  },
  set url(val) {
    this.req.url = val;
  },
};
从以上代码可以看出来的,其实 Koa 提供的 两个 request 和response 对象,就是为了对原生 Node 的 Resquest 和 Response 的某一些属性,做了简单的 getter 和 setter,这样可以使我们写代码时更加简洁,减少直接对原生对象的操作。
其实在 context.js 里面 也有一些类似的处理,不过处理方式稍微有点不同。
const proto = (module.exports = {});

///..
delegate(proto, "request").getter("header").getter("headers");
// ...
这样在 Koa 中,就能以如下方式使用
app.use(async (ctx, next) => {
  // 实际上是调用了 request.header(s);
  console.log(ctx.header);
  console.log(ctx.headers);
});
delegate 的实现其实也很简单。
对于 setter 和 getter方法,是通过调用对象上的 __defineSetter__ 和 __defineGetter__ 来实现的。下面是单独拿出来的逻辑:
/**
 * @param {Object} proto 被代理对象
 * @param {String} property 被代理对象上的被代理属性
 * @param {String} name
 */
function myDelegates(proto, property, name) {
  proto.__defineGetter__(name, function () {
    return proto[property][name];
  });
  proto.__defineSetter__(name, function (val) {
    return (proto[property][name] = val);
  });
}

myDelegates(target, "request", "name");
console.log(target.name); // xintan
target.name = "xintan!!!";
console.log(target.name); // xintan!!!
刚开始我的想法是更简单一些,就是直接让 proto[name] = proto[property][name]。但这样做有个缺点无法弥补,就是之后如果proto[property][name]改变,proto[name]获取不了最新的值。
对于method方法,实现上是在对象上创建了新属性,属性值是一个函数。这个函数调用的就是代理目标的函数。下面是单独拿出来的逻辑:
/**
 *
 * @param {Object} proto 被代理对象
 * @param {String} property 被代理对象上的被代理属性
 * @param {String} method 函数名
 */
function myDelegates(proto, property, method) {
  proto[method] = function () {
    return proto[property][method].apply(proto[property], arguments);
  };
}

myDelegates(target, "request", "say");
target.say(); // Hello因为是“代理”,所以这里不能修改上下文环境。proto[property][method]的上下文环境是 proto[property] ,需要apply重新指定。
Koa 中也有对属性的access方法代理,这个方法就是getter和setter写在一起的语法糖。